Saturday, November 7, 2015

Expecting Glory progress photos

Expecting Glory took me a total of 3 and a half years to complete. I started the painting on two panels in January of 2012 and finished the painting only a couple months ago in 2015. Clearly I'm behind on my blog posts! Hahaha But I'm working on that now to catch up!

This black and white version is how it rested from May of 2012 when I graduated from Winthrop University with my M.F.A. in painting. My thesis work was all in black and white with some of the substrate showing through. In this case, the wood grain from the panels show through the paint. My wife and I moved into our first home in April of this year (2015) and soon there after I installed shelves in one of the bed rooms which has become my art studio.


To see the finished work complete with detail shots visit the page title: "Finished painting: Expecting Glory"

For more information on purchasing this painting, click here.

Friday, November 6, 2015

Creative self portrait by Shane Sminky

I teach a young friend of mine named Shane at Donna Downey Studios. I have taught Shane for over 2 years now and I have always been impressed with his skills and focus being far beyond his years. Here is a photo collage of one of his recent paintings he accomplished in a 2 hour class with me at the studio. We started with a photograph of him and his hand made clay Star Wars Angry Birds characters. He builds hundreds of figures with his clay, each having the expression suiting his or her character. From there we proceeded step by step and layer by layer until he finished his self portrait filled with bright colors and textures.


Thursday, November 5, 2015

Girl's Birthday party at Donna Downey Studios


We host birthday parties at Donna Downey Studios all the time. I recently instructed a party of  creative teenage girls. The birthday girl had a passion for painting and many of the others humored her at the start. The amazing thing happened only moments after beginning, the room went quiet - keep in mind this is a party - and everyone without exception became extremely focused on her work! They all loved it and would ask questions on how to achieve a painterly effect. I walked them through the process step by step and after a couple hours, our time was up. I was very pleased with the results!

I started them out with a few Donna Downey Studios Cling stamp options. Using the stamp of their choice (Off in the distance, Windows to the soul, or What do you see) and a large ink pad, they made their mark on the canvas and the process had begun. Soon there after I demonstrated how to draw hair and shoulders. Then the painting began and I was demonstrating simple flesh tones. I am very proud of the group's positivity and focus!

If you have any interest in parties or classes at Donna Downey Studios, feel free to email me at Stephenlursen@gmail.com 
You can customize your party's art heme to whatever your interested in!


Wednesday, November 4, 2015

Recent student cat portraits

Over the last month, I've taught two private students how to paint their cats. Each painting turned out very well! I wanted to share them with you.


Friday, August 14, 2015

Starry Eyed Workshop - Student Work

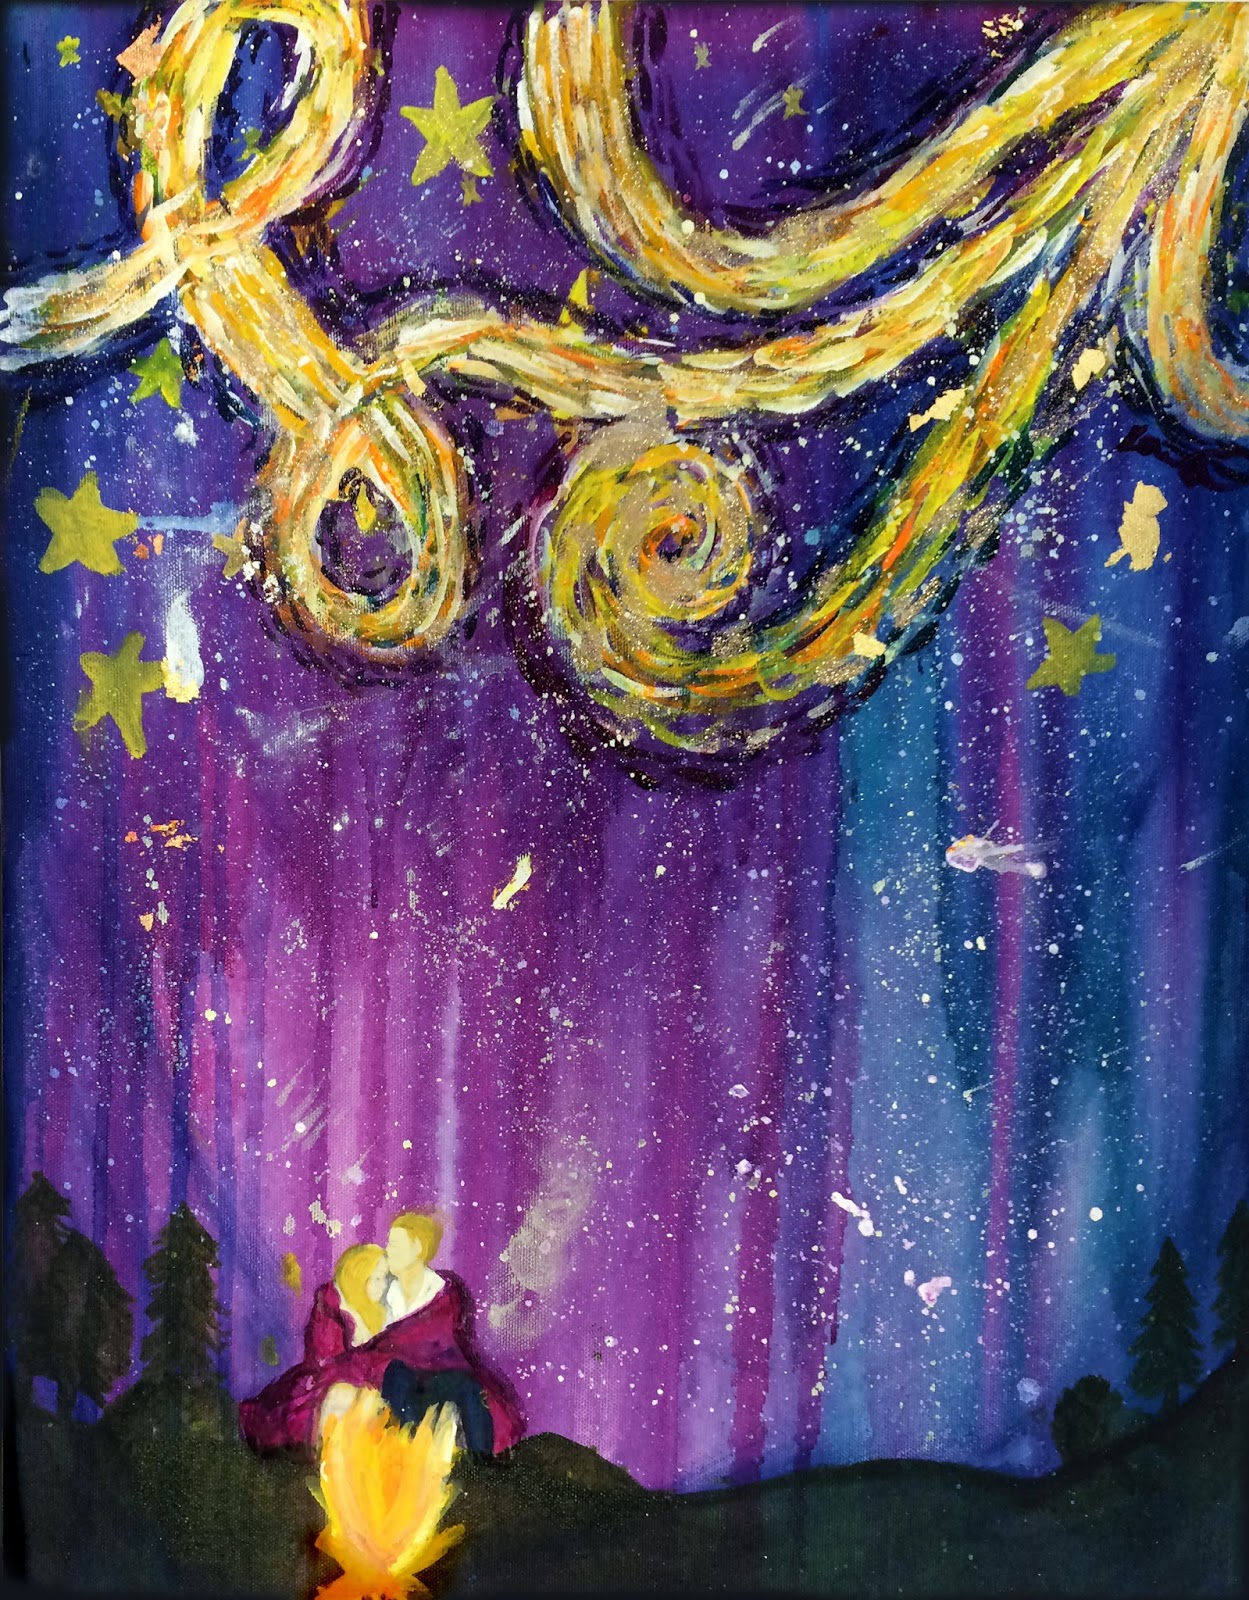
I taught my newest painting "Starry Eyed" at Donna Downey Studios last Saturday. A couple friends of mine Flo and Melody were celebrating Melody's birthday and they brought some friends and family. We all had a wonderful time and I want to show off their paintings. We had 3 hours and I think they each did a beautiful job on their 16"x20" canvases.

Flo's painting


Melody's Painting
I teach this workshop in the studio and as an online workshop. If you are interested in painting this project, please check out the link at: http://www.donnadowney.com/products/starry-eyed-online-workshop

Starry Eyed Workshop Supply list

Starry Eyed Workshop
With Stephen Lursen
Donna Downey Studios
501 S. Old Statesville rd.
Huntersville, NC. 28078

Paint Supplies – Golden Brand fluid acrylics
·   Titanium White
·   Hansa Yellow Light
·   Quinacridone Magenta
·   Quinacridone Nickel Azo Gold
·   Permanent Violet Dark
·   Anthraquinone Blue
·   Paynes Gray
·   Sap Green
·   Green Gold
·   Burnt Umber Light
·   Yellow Ochre
·   Florescent Yellow (I used a craft brand but would have preferred Golden)
·   Florescent Orange (I used a craft brand but would have preferred Golden)
·   Florescent Pink (I used a craft brand but would have preferred Golden)

Medium – Golden Brand
·   Regular Gel (Matte) – Fluid would have worked well also

Brushes
·   2” bulk priming/gesso paint brush (most 2” brushes will do really)
·   1” Simply Simmons brand flat brush
·   One small to medium sized round brush with a point
·   #2 Liner brush – Simply Simmons brand is what I use

Collage Supplies
·   Creative Concepts brand composition gold flakes (Any gold leaf will work)
·   Martha Stewart Craft glitter (I like extra fine glitter.  Color: “Smoky Quartz”)
·   IndigoBlu.com’s Mega-Flake in Autumn Blaze (small metallic flakes in fall colors)

Basic project needs
·   Water Basin + water
·   Paper towel or baby wipes
·   Painting Palette
·   Access to a printer for the included downloadable PDF
·   Scissors
·   4’x3’ Canvas (Or whatever size you are comfortable with)
·   Finishing sandpaper to smooth the surface of a new canvas

·   Easel

Starry Eyed Online Workshop


Starry Eyed Workshop is Stephen Lursen's debut, large scale painting, video workshop. Watch, learn, and work along with him as he paints a 4' x 3' mixed media painting. He breaks each step down with wonderful explanations that clearly demonstrate every step of the process. With a total of 129 minutes (over 2 hours!) of instruction, this experience is the closest you can come to taking a full, in person workshop, with Stephen right here at Donna Downey Studios. 
Concerned about working large for the first time? Don't be! You can do it! Furthermore, this painting is completely scaleable. You can use the lessons learned in this video and create a wide range of paintings, from very small to much larger than Stephen's 4'x3' canvas. No prior painting skills are necessary!
The included collaged element (the figures PDF) are downloadable in 6 sizes to empower you to pick the right size for your canvas.
Feel free to preview the supplies list to make sure you have the necessary supplies and purchase whatever may be needed.
part 1 (10:20) - Beginning an abstract painting
part 2 (13:29) - Fun with splattering paint
part 3 (13:00) - Glazing color over color
part 4 (9:31) - A nod to the past; Vincent van Gogh
part 5 (9:59) - All that glitters and gleams
part 6 (12:11) - Simple landscaping and collage
part 7 (6:37) - Building a fire and letting it glow
part 8 (13:52) - Simple figure painting
part 9 (13:50) - Making it snuggly... painting colorful textiles
part 10 (16:43) - Making smoke signals
part 11 (9:25) - Vignettes and fireflies

Purchase this online workshop to download or stream at: https://howtopaint.myshopify.com/products/starry-eyed-online-workshop
Thank you!
Stephen

Supply List:
Starry Eyed Workshop Supply List
With Stephen Lursen

Paint Supplies – Golden Brand fluid acrylics
·   Titanium White
·   Hansa Yellow Light
·   Quinacridone Magenta
·   Quinacridone Nickel Azo Gold
·   Permanent Violet Dark
·   Anthraquinone Blue
·   Paynes Gray
·   Sap Green
·   Green Gold
·   Burnt Umber Light
·   Yellow Ochre
·   Florescent Yellow (I used a craft brand but would have preferred Golden)
·   Florescent Orange (I used a craft brand but would have preferred Golden)
·   Florescent Pink (I used a craft brand but would have preferred Golden)

Medium – Golden Brand
·   Regular Gel (Matte) – Fluid would have worked well also

Brushes
·   2” bulk priming/gesso paint brush (most 2” brushes will do really)
·   1” Simply Simmons brand flat brush
·   One small to medium sized round brush with a point
·   #2 Liner brush – Simply Simmons brand is what I use

Collage Supplies
·   Creative Concepts brand composition gold flakes (Any gold leaf will work)
·   Martha Stewart Craft glitter (I like extra fine glitter.  Color: “Smoky Quartz”)
·   IndigoBlu.com’s Mega-Flake in Autumn Blaze (small metallic flakes in fall colors)

Basic project needs
·   Water Basin + water
·   Paper towel or baby wipes
·   Painting Palette
·   Access to a printer for the included downloadable PDF
·   Scissors
·   4’x3’ Canvas (Or whatever size you are comfortable with)
·   Finishing sandpaper to smooth the surface of a new canvas

·   Easel


Wednesday, June 24, 2015

Back story: "Expecting Glory"

Hello friends! I am ridiculously excited to have finished a work in progress from 2011 - 2015! The painting is on 2 7' tall x 3' wide slab doors. I purchased the doors raw without hinges, holes, or hardware. They were essentially large artist panels. I began this painting in 2011 in grad school as a stop motion short film. It began as a joke and developed into something more serious.

1st video filmed on this panel.


My professors weren't impressed with the low production value or low artistic quality, but they were very encouraging of doing more to get better. I learned a lot through this project, like setting the camera up on a tripod instead of holding it to snap photos. This video could make someone sea sick! LOL!

Then the next video:


This was shown to my advising panel of professors and still had problems. Problems such as breaking the viewer out of the artwork by including my feet and the sun. Also I still refused to use a tripod so the production value was choppy and inconsistent. Also, it never occurred to me to use a camera setting of a 16:9 ratio (widescreen format) for the video... Lessons learned along the way right?

Video version #3: final version


In this final version, I cut away the highly criticized cartoon-like beginning because it was a narrative that told a story overtly representing life and the passing of time.

“Artists are people driven by the tension between the desire to communicate and the desire to hide.” ― D.W. Winnicott


I wanted to figure out a way to represent the concept of time passing in a more abstract way. So I hung a lightbulb via its power cord and moved it across the picture plane like the rising and setting of the sun. Thus the concept of past, present, and future was born within this work. The past is represented by darkness and the future by the light.

I perceived the work finished at this point and hung the painting, among others, at my thesis show. I played 5 videos via a projection on the back wall of the gallery.


I hung this painting in my first apartment when married to my wife Cara. And two, possibly three, years have passed. We just moved into our first home in April of 2015 and I now have an in home studio. Inspired by the new opportunity to create within my personal studio, I began work rebooting the black and white work into a vibrant painting...


Monday, June 22, 2015

Painting Camp Summer 2015

Last week was a wonderful time at Donna Downey Studios as 5 student artists came and painted all week long. Each day each artist had to paint whatever they wanted within a given theme.

Day 1: Expressive Self Portrait


Day 2: Landscape 


Day 3: The Figure


Day 4: From nature


Final day photos: (day 5 - free project)

McKenna 2015


Isabel 2015

Laura 2015

Alex 2015

Jonathan 2015

Thank you all for working so hard last week! I hate that McKenna had to go before we took the picture. I very much look forward to working together in the future!!! Your friend,
Stephen


Tuesday, June 16, 2015

Rose View of Heaven - SOLD!

In 2014 I was commissioned to create a painting for a customer in the Lake Norman area. We met and had a brief conversation about what colors she likes and dislikes and about the fact that she wanted the painting to give the experience of looking at clouds - having no intentional imagery, but the opportunity to read into it what one sees in the moment.

I started by painting 2 small scale mock ups for a 2nd meeting where I could get more feedback giving me a little bit more clarity on her hopes and dreams for the painting.

Once we met and discussed I got to work on the larger painting. The final canvas is 5' tall x 4' wide.

I installed it in her home and was allowed to take a number of pictures as it hung.

Thank you Nancy!

These are the photos from the first installation. About a year later when she commissioned me to create a second painting for their bedroom, she asked me to make some small changes to the painting and frame it. The newest pictures are below the older pictures, so keep scrolling down to see the updates! Thank you!
Rose View of Heaven
Stephen Lursen
Acrylic on canvas
5' x 4'
2014
SOLD


UPDATE PHOTOS 2016